Configuring to poll data from PHIN Messaging System
(PHIN MS)
eMaRC PlusTM
For Version 5.2 With NAACCR 150
Version 5.3 With NAACCR 160
Version 6.0 with NAACCR 160
Centers for Disease Control and Prevention National Center for Chronic Disease Prevention and Health Promotion Division of Cancer Prevention and Control National Program of Cancer Registries Registry Plus Software for Cancer Registries
Configuring to poll data from PHIN Messaging System (PHIN MS)
There are two different module in eMaRC Plus 5.1.X
A) ePath Module
B) Physician Module.
Each module could have different database to pull
message from PHINMS Queue.
1. Login to System Configuration
2. Click on PHNIMS Setting tab
3. You will see the following screen
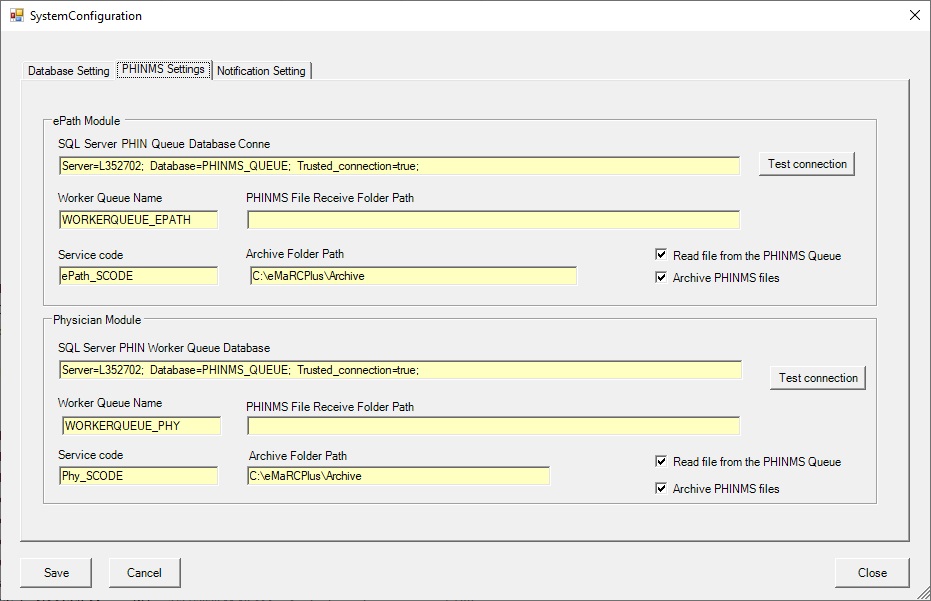
10. Choose Microsoft SQL server under Database Type
11. Delete default connection string
under ePath Module. And type in connection string for ePath PHINMS Queue.
here is example:
Replace characters in red
with appropriate settings for your database:
PROVIDER=SQLOLEDB;
SERVER=YourDatabaseName; DATABASE=YourDatabaseName;
UID=DatabaseUserID; PWD=DatabasePassword
12. Click on “Test Connection” to check
connection string
13. Now delete default value under Worker
Queue name and type in new one. This is actually the name of database
table where PHINMS Queue gets written by 3rd party program.
14. Now delete default value under Service
Code, and put relevant code here. Service Code is the filter term to
filter cancer related data from PHINMS Queue. You could be receiving non-cancer
related message (data) in the same queue.
15. Select “Read File from PHINMS Queue”
since we are reading messages (Data) from database table.
16. Put appropriate folder path under “Archive
Folder Path”. You would need to do this only if you select “Archive PHINMS
files” option.
Repeat all of the above steps for Physician
Module. If you are receiving documents (Data) in the same PHINMS queue for Physician
module, you could simply copy and paste all of the above information that you
have for ePath Module. But Service Code will be different for each module.
|
1 |
Worker Queue Name:
This is the name of the table where the PHINMS
file gets written by some other mechanism. |
|
2 |
Archive PHINMS file:
During the import of batch files from the PHINMS
database table, eMaRC Plus writes each file into a separate temporary text
file. After the files are imported, the files are deleted, but if you would
like to keep the temporary files, then check the Archive PHINMS Files
box.
|
|
3 |
PHINMS File Receive Folder Path:
Imports message from a specific folder path. This
approach allows the user to store files into a specific folder and eMaRC Plus will import the files from that folder path
rather than from the PHINMS Queue.
NOTE: You have two distinct ways to
import Messages:
1.
From PHINMS Queue
2.
From Folder Path
|
|
4 |
PHIN Worker Queue Connection String:
Include the connection string to connect eMaRC
Plus to the PHINMS Work Queue database table. It is highly recommended that
you keep the PHINMS database and eMaRC Plus database separate.
|
|
5 |
Test Connection:
If the connection information is accurate, then
you will see a pop up message Connection Successful. |
|
6 |
Service Code:
The PHINMS Worker Queue table could be receiving
data for non-cancer programs, such as syndromic
surveillance or Electronic Laboratory Reporting for infectious diseases. If
this is the case, then it is critical that you include a service-code so that
eMaRC Plus will only import cancer related data files. Each file must have
the proper service code populated in the Service Column in the PHINMS Worker
Queue database table.
|
|
7 |
Archive Folder Path:
This represents the location where temporary
files are stored while importing from the PHINMS queue. It is recommended
that this location be on a network drive, so that we can secure the files
being stored. |
|
8 |
Select the Database Type:
Depending on which database your organization uses, change the database type
to either SQL Server or Oracle. The eMaRC Plus application is distributed
with an Access database for testing and review purposes only. It is
strongly recommended that your organization not use the Access database for
production. |
|
9 |
Store database Connection string in the encrypted
format: This will encrypt the database connection string information in the MyConfig.cfg file, so that this connection string
information is not accessible by opening the MyConfig.cfg
file in a text editor. |
|
10 |
Pathology Reports database Connection String: This is
the main pathology database connection for the ePath
Reporting Module within the eMaRC Plus application. |
|
11 |
Test Connection:
Allows you to test connection string for Pathlab database (the main
database for eMaRC Plus) |
Public Health Information Network Messaging System (PHINMS) Queue (Polling)
What is PHINMS?
Please read article from the following URL:http://www.cdc.gov/phin/tools/PHINms
How PHINMS (Polling) works?
A pathology laboratory will use PHINMS Queue
to send cancer data to your intuition in the HL7 format. HL7 format is defined
in the North American Association of Central Cancer Registries (NAACCR) Volume
5 standard format. These files usually initially get
stored in a secure network drive folder. An
some application will read the contents of each file and write it into the
PHINMS database table (e.g. Workerqueue
table).
eMaRC Plus imports data from this PHINMS database table. The PHINMS
database table is not part of the eMaRC Plus software, but eMaRC Plus use this
table as source.
Configuring application to import data from PHINMS (Polling)
You will need to establish
separate database for the PHINMS polling mechanism.
You can download the script PHINMS Queue script to create a PHINMS database
table from the following URL:
For SQL Server 2008 Database
See above section called “Configuring PHINMS Queue”
How to import from the PHINMS Queue?
Please see eMaRC Plus documentation provided
under the Help menu within the application.
Command Line Interface (CLI)
Both module 1) ePath Reporting and 2) Physician
Reporting has command line Interface (CLI). The primary purpose of CLI is to
automate import using batch file conjunction with window’s
scheduler.
Sample Command Line Syntax for ePath Module
|
emarcplus.exe User=doe pwd=guest fileformat=hl7 file=c:\MyHL7
|
Note:
a.
The Command Line Interface imports all HL7 files from the specified
folder path.
b.
Make sure source folder name DO NOT contains spaces
e.g. We cannot have folder
name like My Documents/HL7
Files.
c.
Importing message from file may take several minutes depending upon
file-size.
d. System
will create sub folder called �Archive� inside
the source folder.
Each successfully imported file gets moved into this subfolder.
eMaRC plus won�t move any file
which has an issue, and user need to figure out what causing that file not getting
imported in to system.
Sample Command Line Syntax for Physician Module
|
eMaRCPlus.exe FILE=c:\emarcplus\sampledata\CDA MODULE=2 User=doe pwd=guest
|
Note:
a.
The Command Line Interface imports all CDA files from the specified
folder path.
b.
Make sure source folder name DO NOT contains spaces
e.g. We cannot have folder
name like My Documents/CDA
Files.
c.
Importing message from file may take several minutes depending upon
file-size.
d. Successfully
imported file from source folder will be moved to Archive Folder
(Please check Archive folder path under Administration/System
Configuration)
Automating import process using batch file and Windows Scheduler
eMaRC Plus can be automated to
import messages located in a Folder via Command Line Interface using batch
file.
It
requires the following component need to be configured
1.
Install, and configure eMaRC Plus on dedicated server
2.
Place Batch file that imports message via Command Line Interface in some
folder
(See Batch file section below)
3.
Configure Windows Scheduler on the server where eMaRC Plus is installed.
Windows Scheduler need to run that batch file every night during X o' Clock
How to create Batch File for ePath Module?
Copy and paste the following code
into text file by providing appropriate parameter as stated in remark section.
1. Click on
File/Save
2. Make sure
you would choose All Files (*.*) under Save as type
3. Name this ePathImport.bat.
|
REM ********************************************************************************************* REM * This batch file will trigger eMaRC Plus command line interface REM * to import file from a folder REM * Please use appropriate value for the following parameters REM * User ==> doe ==> This is your user id REM * Pwd ==> guest ==> This is your password REM * FileFormat =HL7 ==> This is the type of file that you are about to import. I could be HL7, PIPE etc. REM * File ==> c:\MyHL7 ==> This is the path for file located. REM * REM ********************************************************************************** @ECHO On SET GONEXT=C: %GONEXT%
CD C:\eMaRCPlus START emarcplus.exe User=doe pwd=guest fileformat=hl7 file=c:\MyHL7 EXIT
REM ************************** END OF Batch FILE ************************************ |
Note
- The Command Line Interface imports all HL7 files from the specified folder path.
- Make sure source folder name DO NOT contains spaces
e.g. We cannot have folder name like My Documents/HL7 Files. - Importing message from file may take several minutes depending upon file-size.
- System will create sub folder called Archive inside the source folder.
Each successfully imported file gets moved into this subfolder.
eMaRC plus won’t move any file which has an issue, and user need to figure out what causing that file not getting imported in to system.
How to create Batch File for Physician Module?
Copy and paste the following code into text file by providing
appropriate parameter as stated in remark section.
1.
Click on File/Save
2.
Make sure you would choose
All Files (*.*) under Save as type
3.
Name this PhysicianImport.bat.
|
REM ********************************************************************************************* REM * This batch file will trigger eMaRC Plus command line interface REM * to import file from Rhapsody folder REM * Please use appropriate value for the following parameters REM * User ==> doe ==> This is your user id REM * Pwd ==> guest ==> This is your password REM * MODULE=2 ==> Indicates Physician Module REM * File ==> c:\MyHL7 ==> This is the path for file located. e.g REM * REM ********************************************************************************* @ECHO On SET GONEXT=C: %GONEXT%
CD C:\eMaRCPlus START eMaRCPlus.exe FILE=c:\emarcplus\sampledata\CDA MODULE=2 User=doe pwd=guest EXIT REM ************************** END OF Batch FILE *********************************** |
Note:
- The Command Line Interface imports all CDA files from the specified folder path.
- Make sure source folder name DO NOT contains spaces
e.g We cannot have folder name like My Documents/CDA Files. - Importing message from file may take several minutes depending upon file-size.
- System will move each successfully imported file from source folder to Archive Folder (You would specify Archive folder path from Administration/System Configuration)